
How to Enable Sledge Core and Complete the Initial Setup ?
Sledge Core is the app embed that connects Sledge to your theme. It’s a single switch in your theme settings, and it’s the one thing every other feature depends on.
Sledge Core is the app embed that connects Sledge to your theme. It’s a single switch in your theme settings, and it’s the one thing every other feature depends on.
Nothing else works until it’s on. Your search, filters, bundles, recommendations, cart drawer, wishlist, and reviews can all be configured perfectly in the admin and still show nothing on the storefront, because Sledge Core is what actually loads them onto your pages. Turn it on once and it stays on.
The quickest way to do it is the setup wizard, which walks you through five steps — switching Sledge Core on, telling Sledge what you sell, reviewing your benchmarks, choosing where Sledge runs, and activating your first tools. This guide follows that wizard from start to finish.
Before you start — You need a published theme and permission to edit it. The whole run takes about five minutes, and you can leave at any point with Remind me later — the wizard remembers where you stopped.
Step 1 — Switch on Sledge Core
-
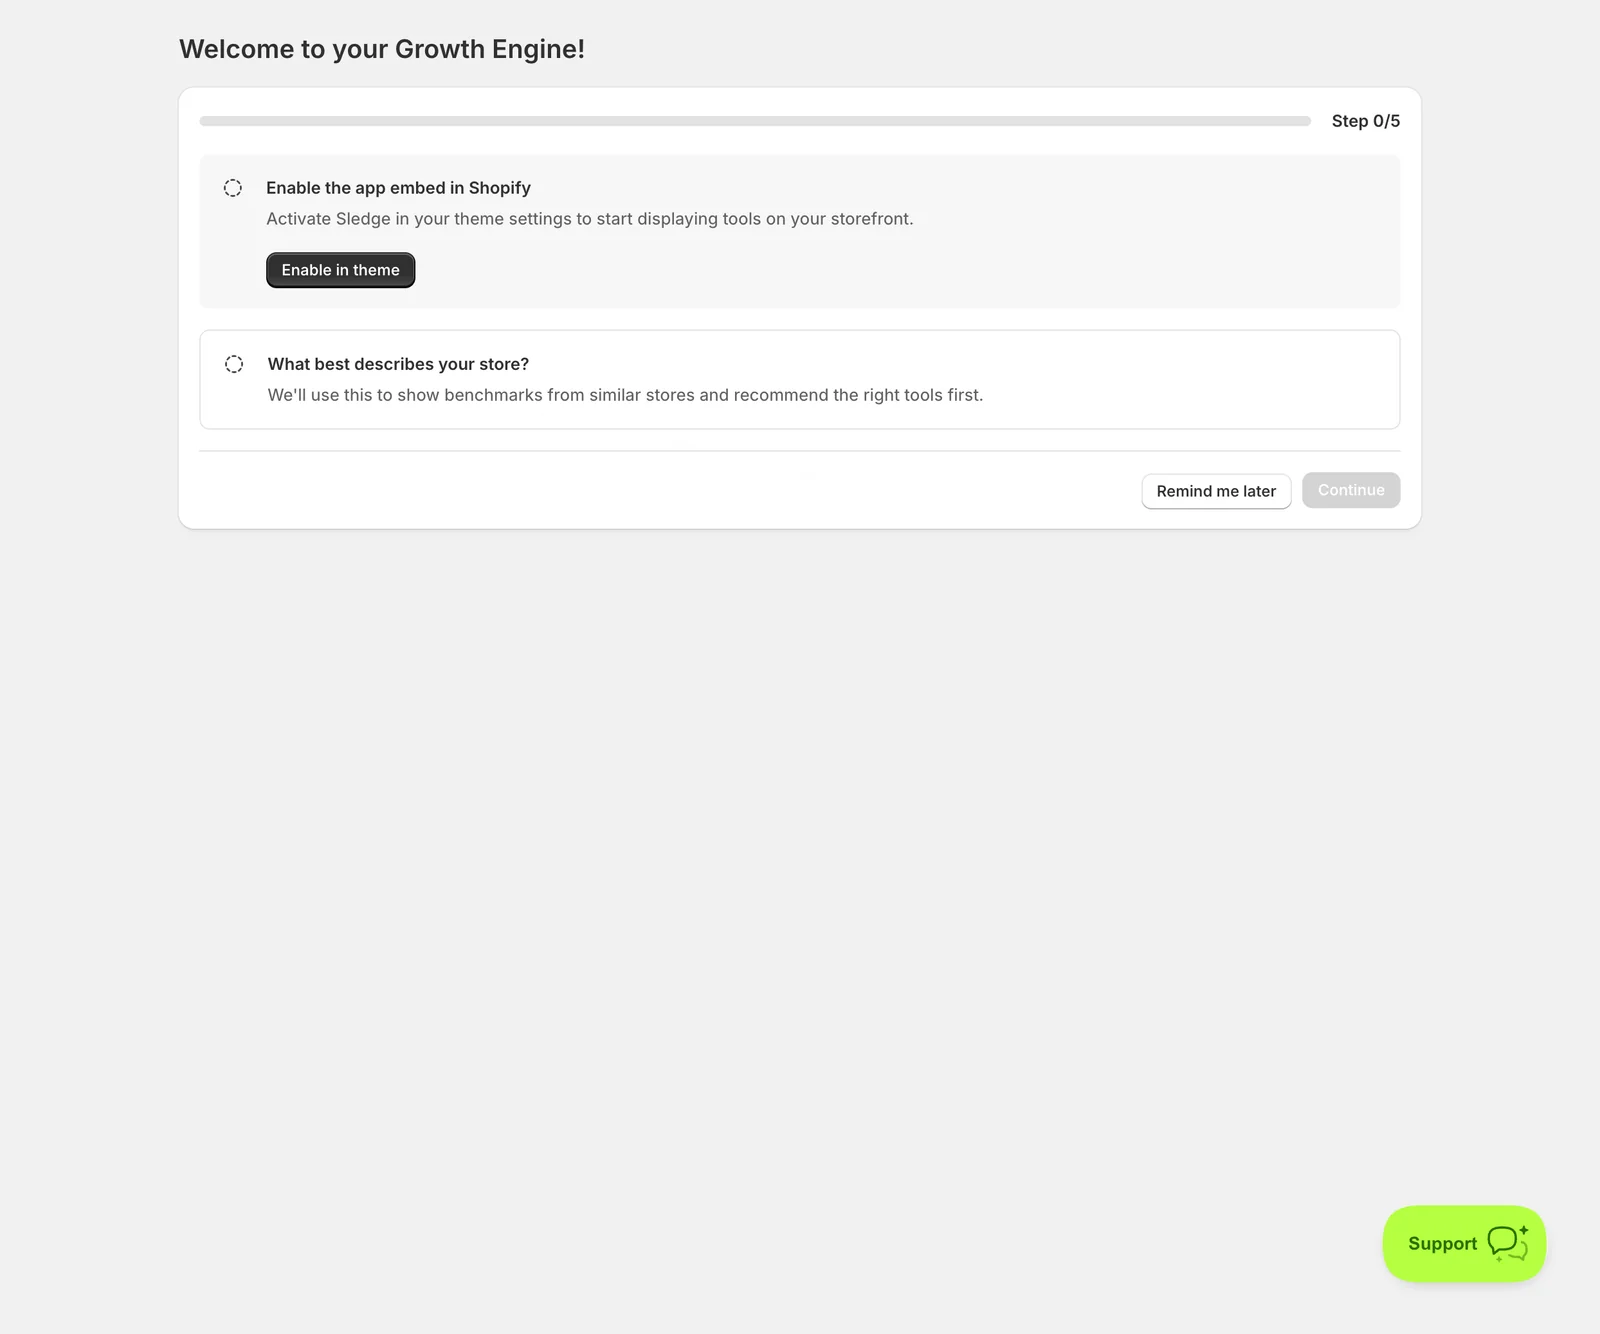
Open the Sledge app and go to Onboarding. You’ll land on Welcome to your Growth Engine! at Step 0/5.
-
The first card is Enable the app embed in Shopify. Click Enable in theme.
-
Shopify opens your theme editor with the App embeds panel already filtered to Sledge Core, and the toggle already switched on for you.
-
Click Save in the top-right. This is the step merchants miss most often — the deep link turns the toggle on, but nothing reaches your storefront until you save the theme.
-
Go back to the Sledge tab. The card now reads App embed enabled — Sledge is active on your theme, and the progress bar moves to Step 1/5.
Prefer to do it by hand? Go to Online Store → Themes, click Customize on your live theme, open the App embeds panel (the apps icon in the left toolbar), find Sledge Core, switch it on, and click Save. Type “Sledge” in the search box to filter the list. Sledge Core has no settings of its own — it only needs to be on.
Step 2 — Tell Sledge what you sell
-
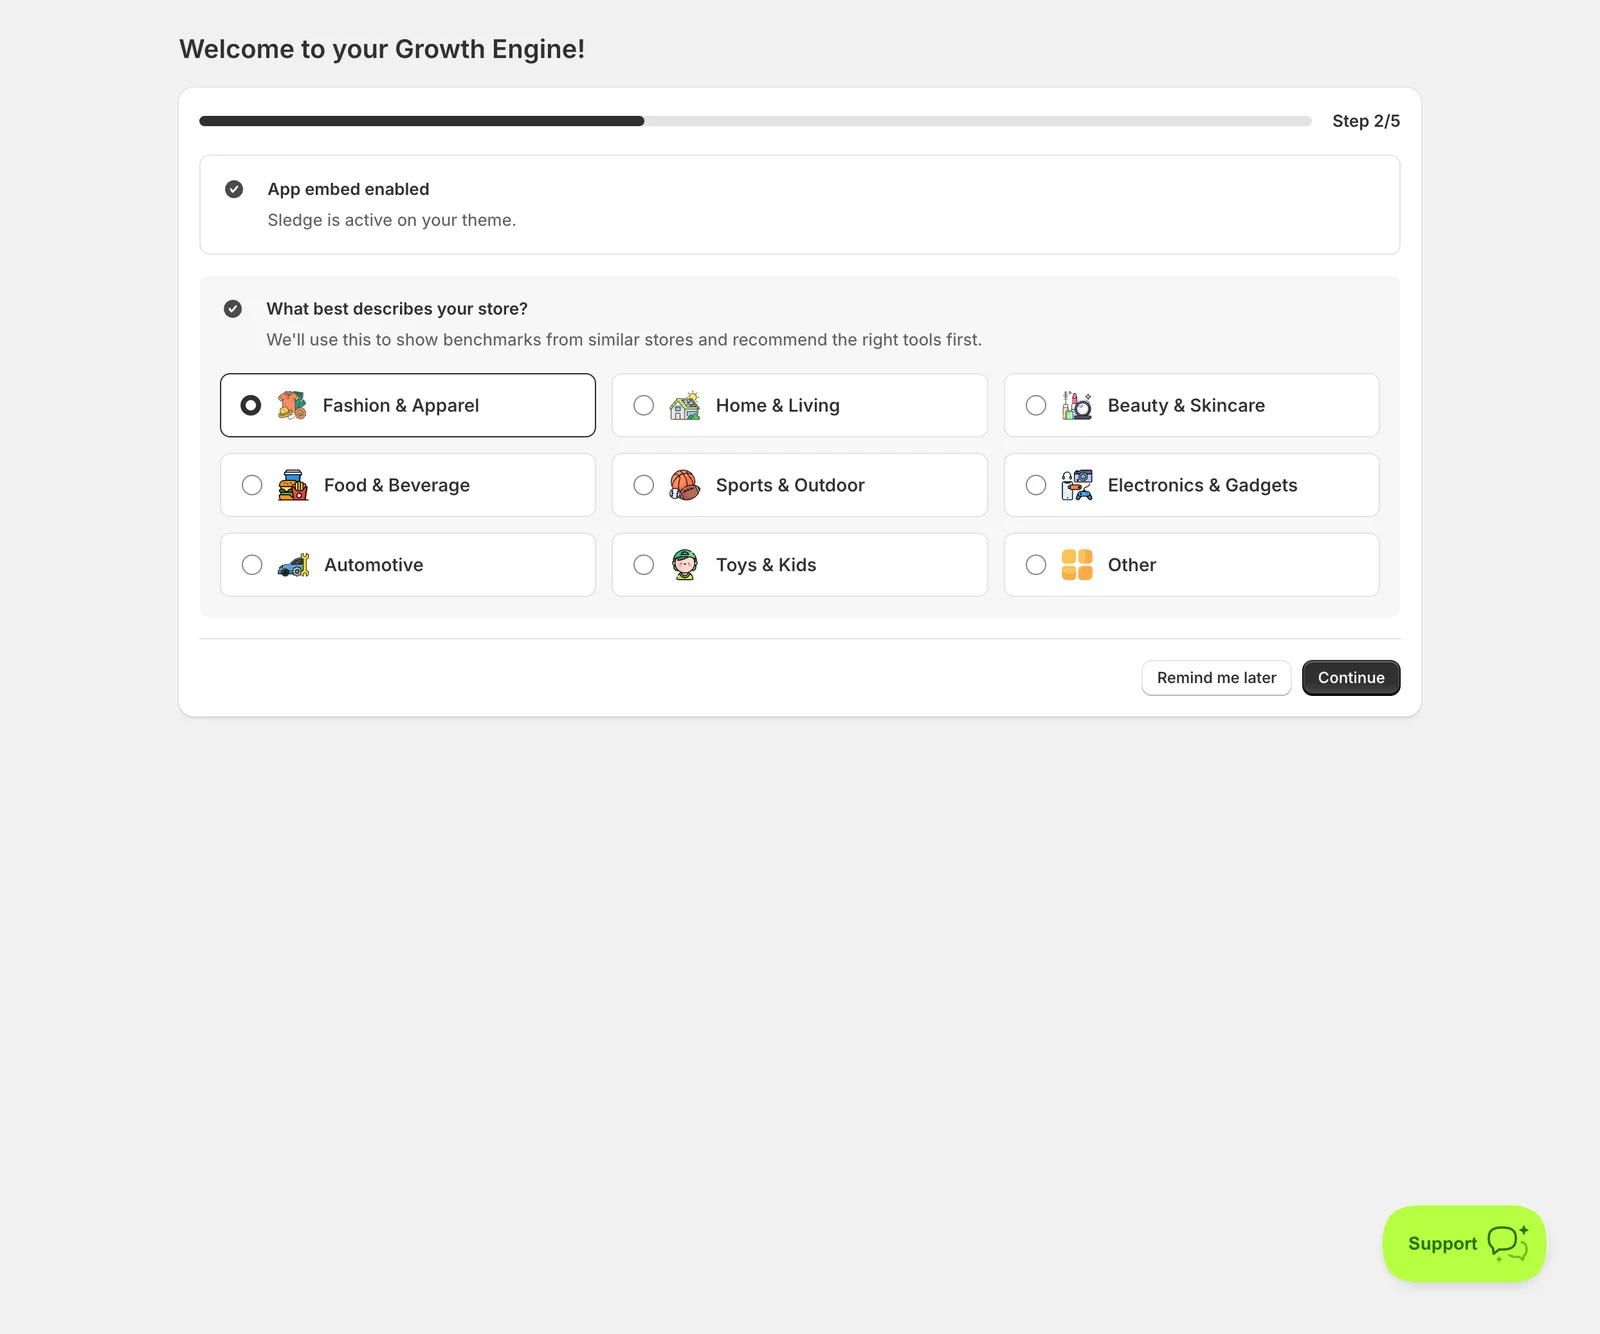
Under What best describes your store?, pick the category that fits — Fashion & Apparel, Home & Living, Beauty & Skincare, Food & Beverage, Sports & Outdoor, Electronics & Gadgets, Automotive, Toys & Kids, or Other.
-
This isn’t cosmetic. Your answer decides which benchmarks you’re shown next and which tools the wizard recommends first, so pick the closest match rather than Other if one fits.
-
Click Continue.
Step 3 — Review your benchmarks
-
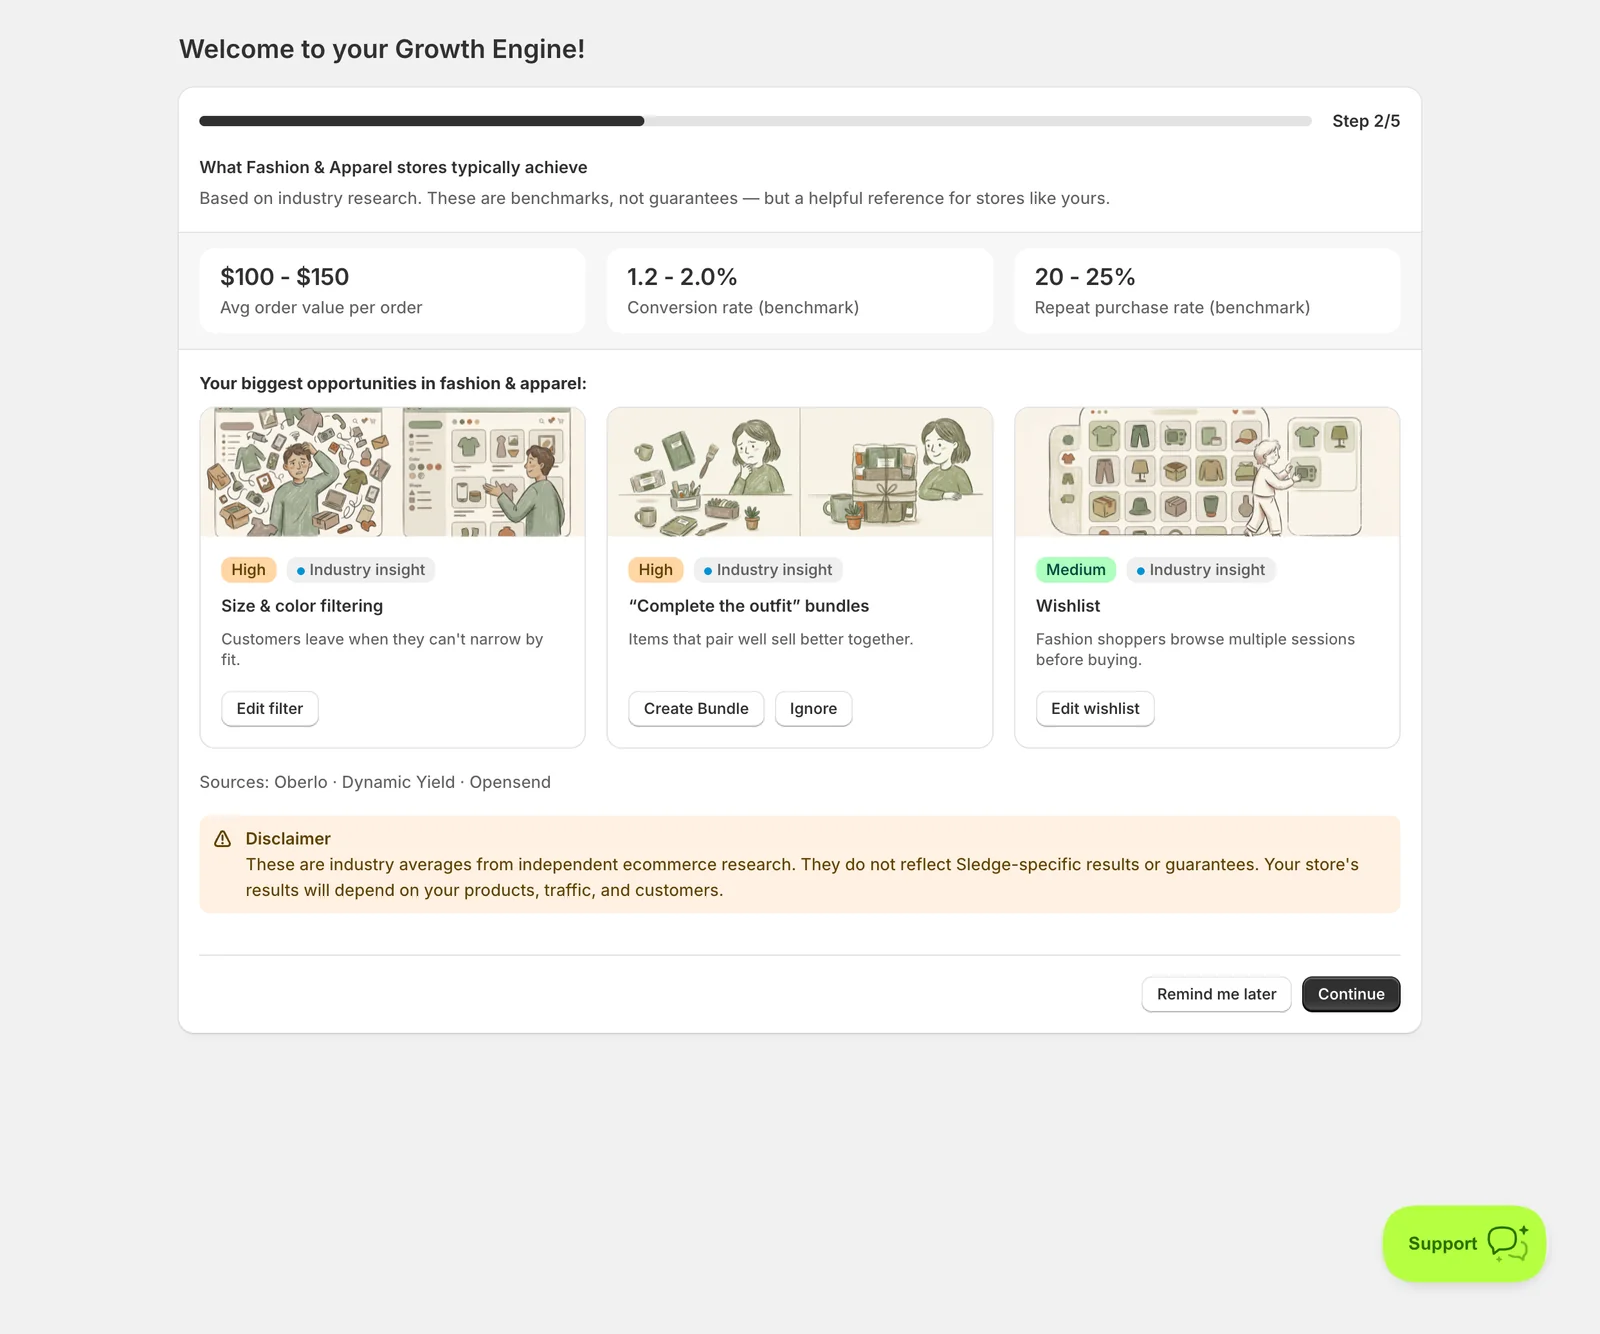
Sledge shows what stores in your category typically achieve — average order value, conversion rate, and repeat purchase rate. For Fashion & Apparel that’s roughly $100–$150 AOV, 1.2–2.0% conversion, and 20–25% repeat purchases.
-
Below that, Your biggest opportunities lists the gaps worth closing first, each tagged High or Medium priority, with a shortcut button to set it up.
-
Read the Disclaimer: these are industry averages from independent research, not Sledge-specific promises. Treat them as a reference point, not a target you’re failing to hit.
-
Click Continue.
Step 4 — Choose where Sledge runs
-
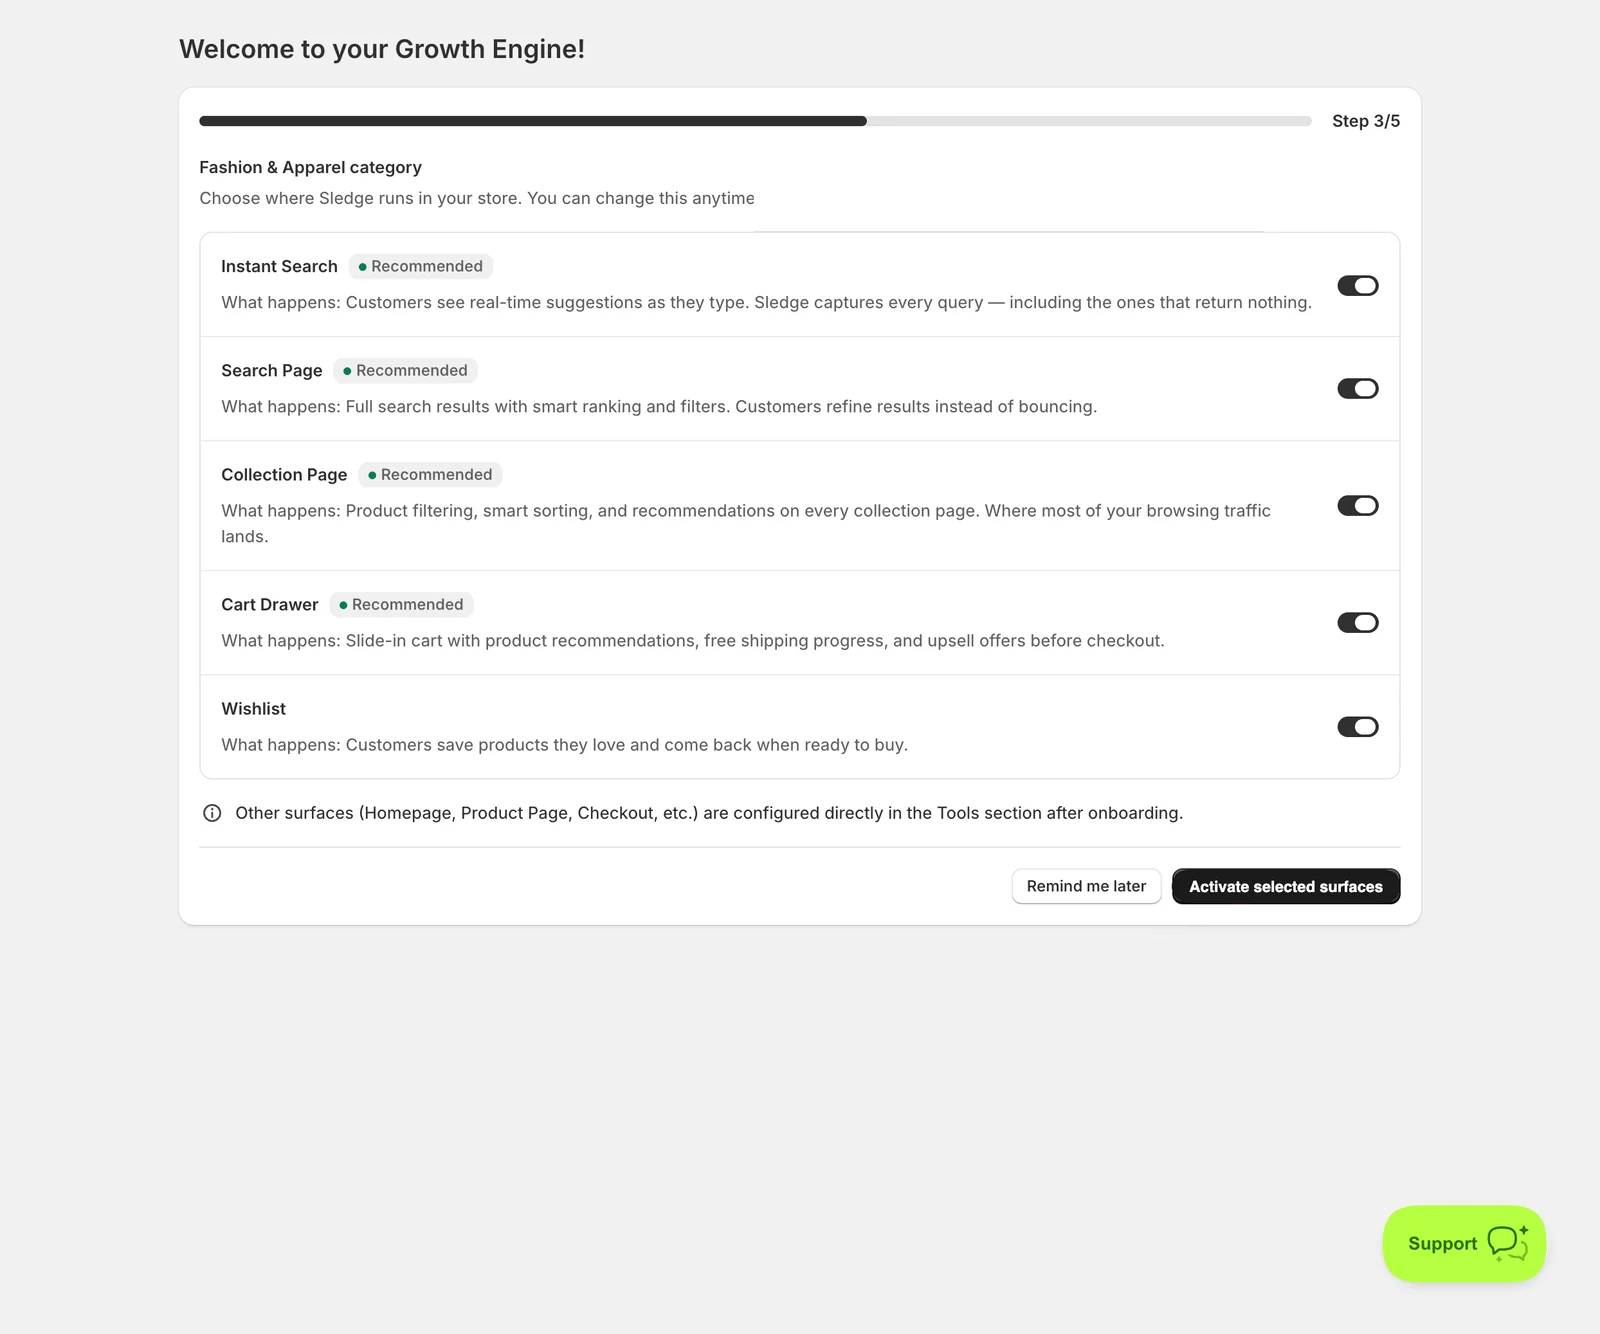
Under Choose where Sledge runs in your store, switch on the surfaces you want. Each one explains exactly what it changes:
-
Instant Search (Recommended) — real-time suggestions as customers type. Sledge captures every query, including the ones that return nothing.
-
Search Page (Recommended) — full results with smart ranking and filters, so customers refine instead of bouncing.
-
Collection Page (Recommended) — filtering, smart sorting, and recommendations where most browsing traffic lands.
-
Cart Drawer (Recommended) — slide-in cart with recommendations, free-shipping progress, and upsells before checkout.
-
Wishlist — customers save products and come back when they’re ready to buy.
-
-
Leaving all five on is the sensible default — they’re the highest-traffic parts of a store. You can change any of them later.
-
Click Activate selected surfaces.
Note — the other surfaces (Homepage, Product Page, Checkout, and so on) aren’t in the wizard. You configure those per feature in Tools once setup is done.
Step 5 — Activate your quick wins
-
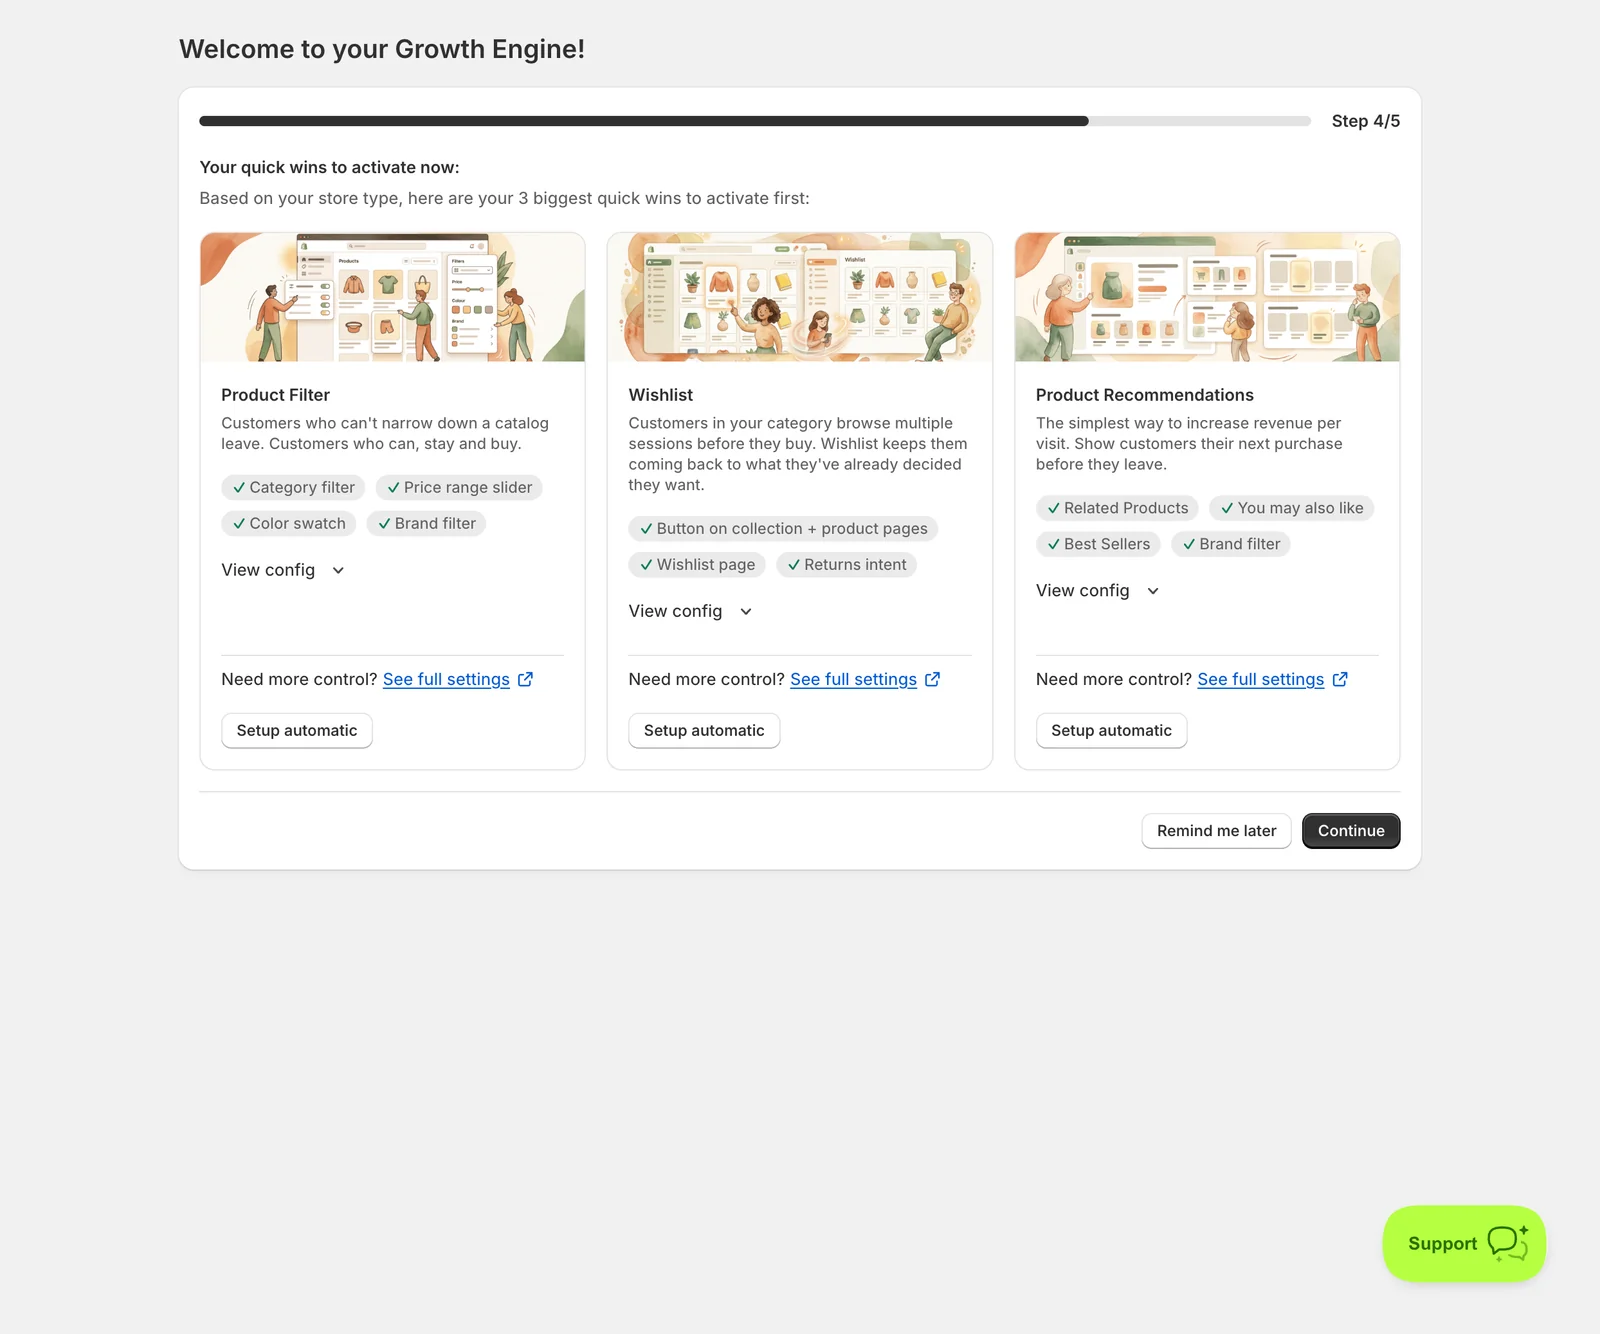
Sledge picks the three tools with the biggest impact for your category and shows what each one would switch on. For Fashion & Apparel that’s Product Filter, Wishlist, and Product Recommendations.
-
Click Setup automatic on a card and Sledge configures it with sensible defaults — for Product Filter that’s category filter, price range slider, color swatch, and brand filter, all built from your own catalogue.
-
Do the same on the other two cards. Use View config first if you want to see exactly what will be applied, or See full settings to open that tool’s full settings page instead.
-
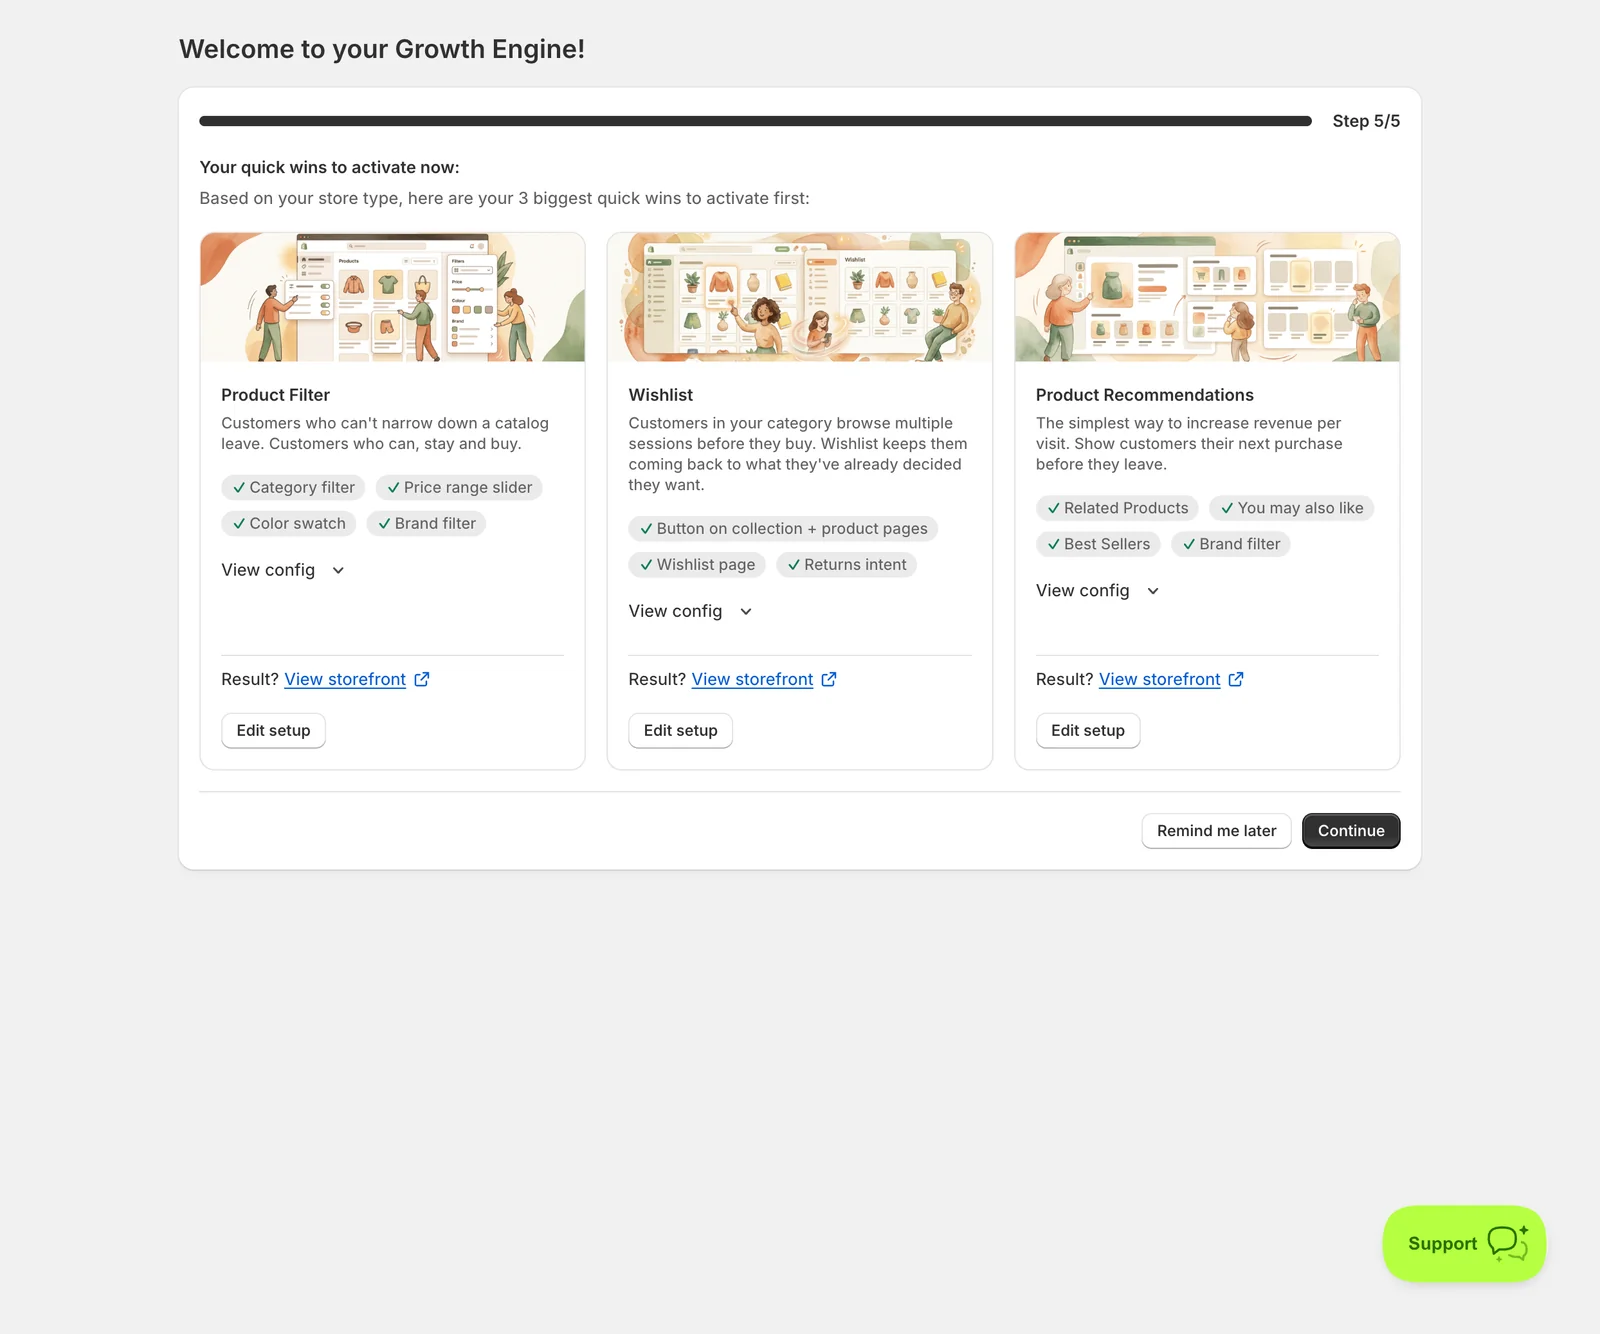
Once a card is set up it changes to Edit setup with a View storefront link, so you can check the result immediately.
-
Click Continue to finish.
Result
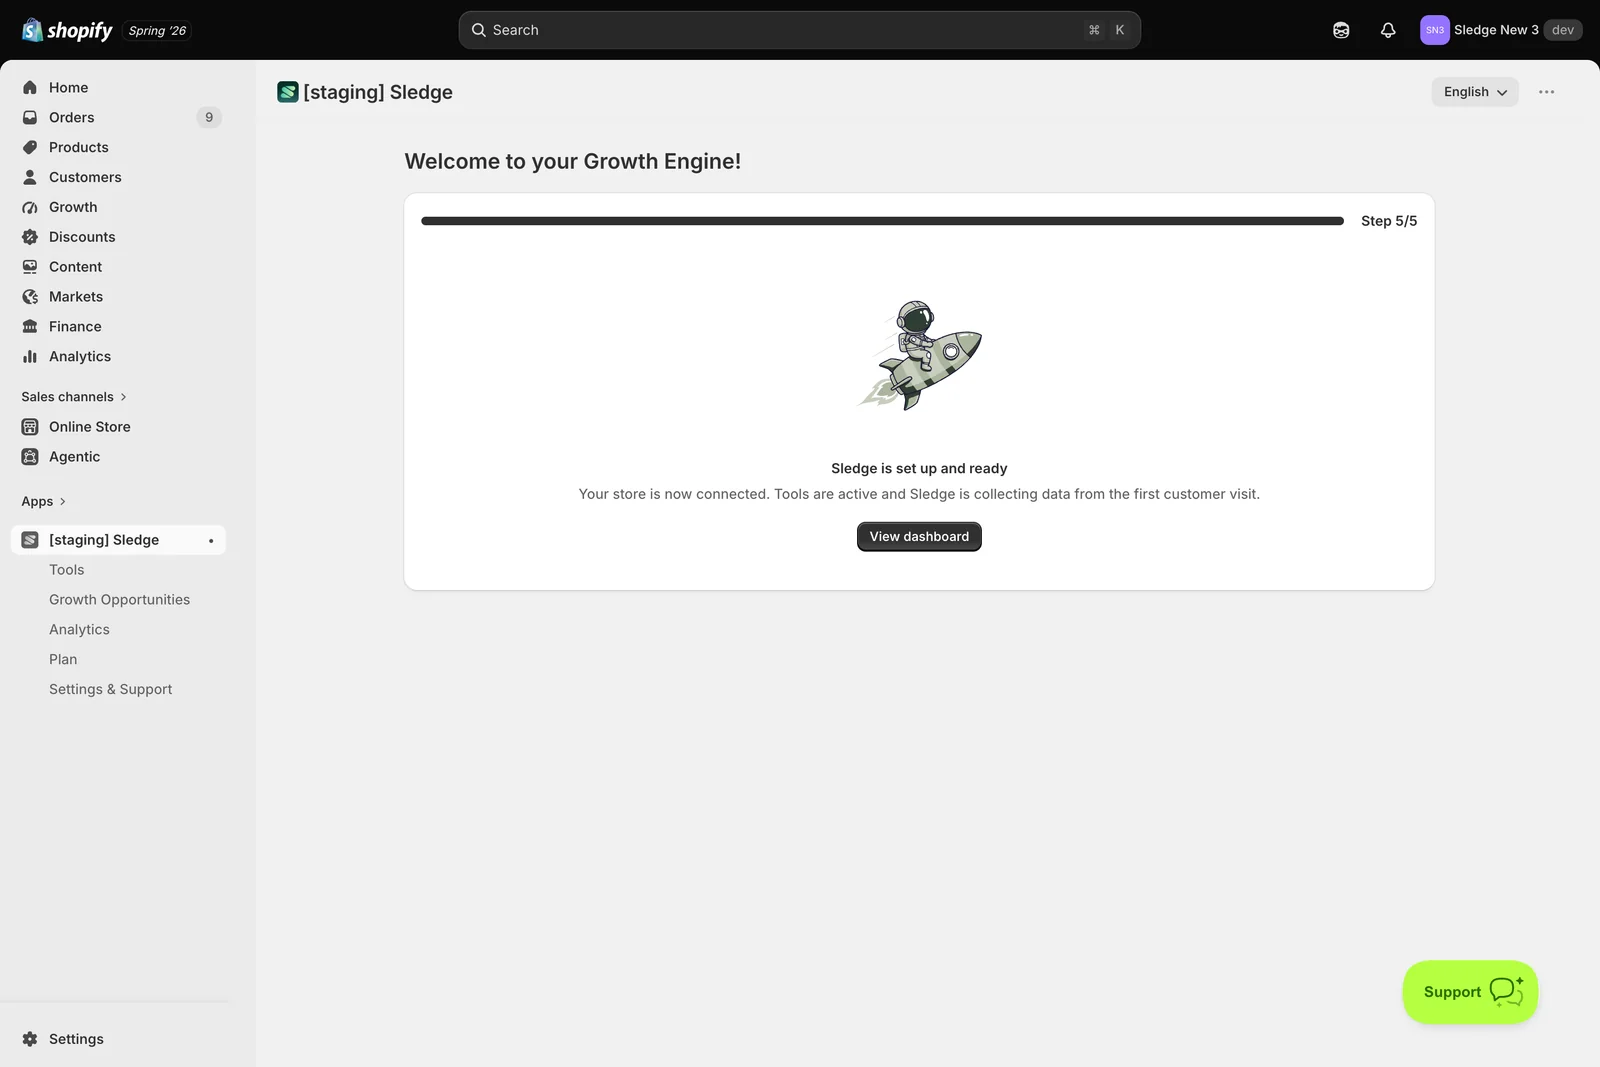
Done. The wizard confirms Sledge is set up and ready — your store is now connected. Tools are active and Sledge is collecting data from the first customer visit. From here, View dashboard takes you into the app.
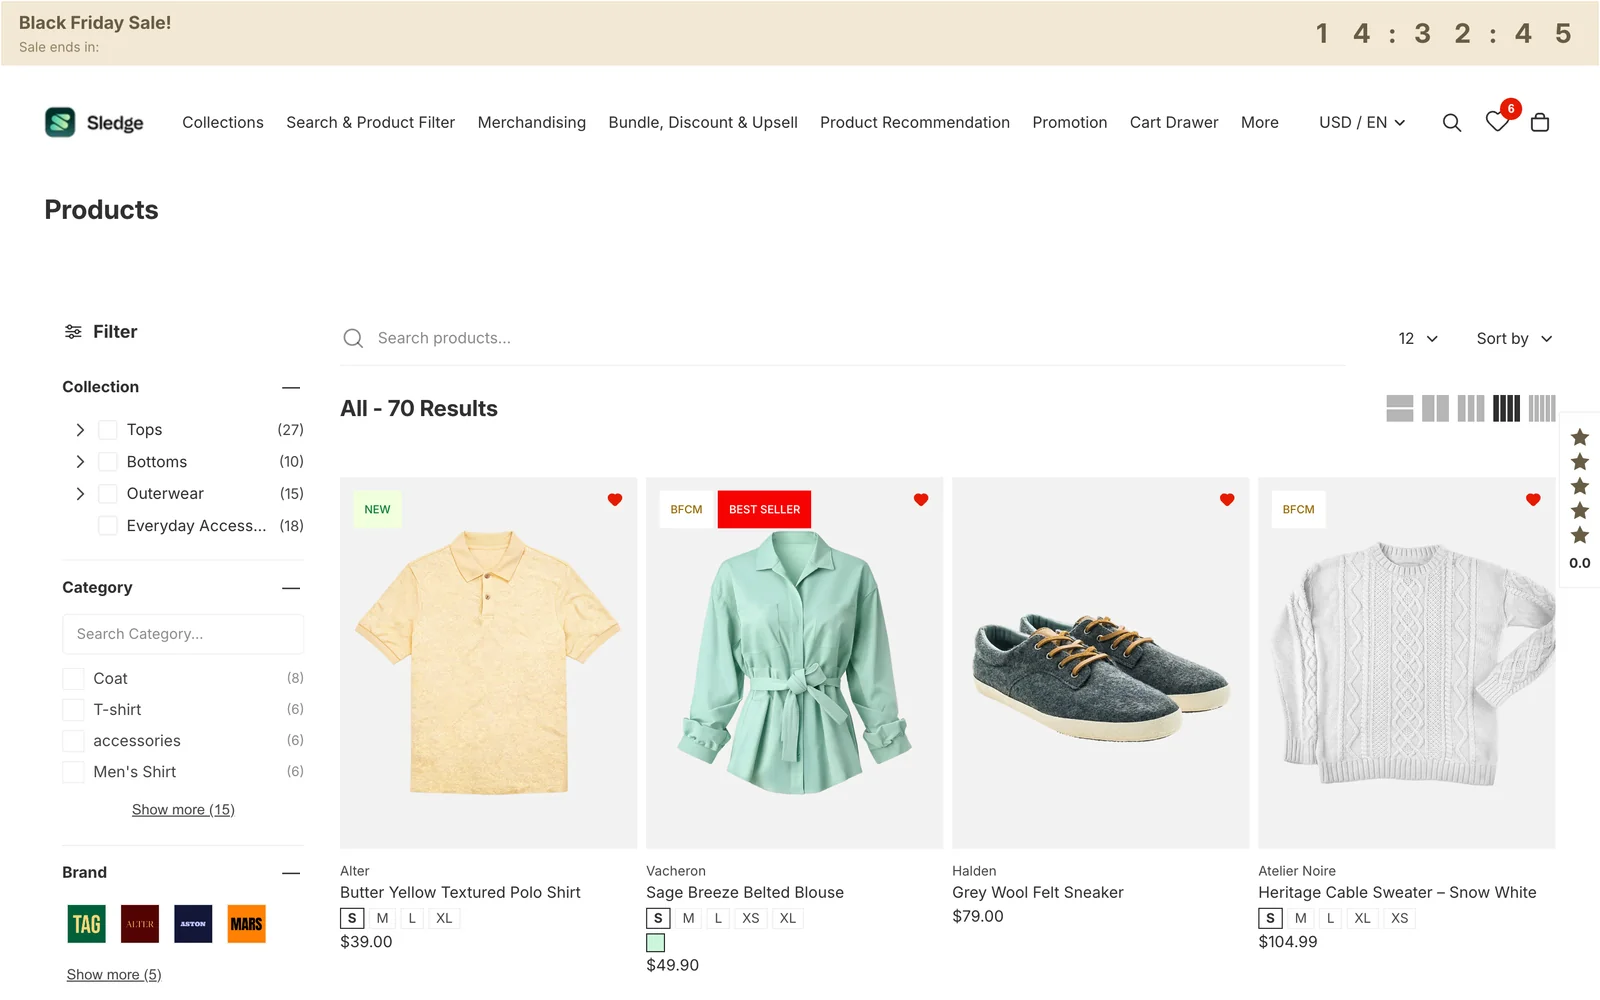
On the storefront, the tools you activated are now live. Below, a collection page is running the Sledge filter panel down the left, Sledge search across the top, and wishlist hearts on every product card with a running count in the header.
Not showing up?
Work through these in order — the first two cause most cases.
- Did you click Save in the theme editor? Switching the Sledge Core toggle on isn’t enough on its own. Reopen the theme editor and confirm the toggle is still on.
- Are you looking at the theme you edited? If your store has several themes, the embed has to be on in the one that’s published. Enabling it on a draft or a duplicate changes nothing for customers.
- Is the individual feature enabled? Sledge Core loads the tools; each tool still has its own Status switch under Tools.
- Is the surface switched on? A feature only renders on the surfaces you enabled — check the feature’s Surfaces section.
- Give it a minute. Storefront changes take about a minute to sync. Reload with a hard refresh before assuming it’s broken.
- Is your store password-protected? A locked storefront shows the password page, not your theme — so no Sledge widgets appear. Enter the password first, then check.
Related
- Understanding your Sledge Dashboard: revenue, growth intelligence, and live signals
- Growth Opportunities by Goals: working through the playbook outcome by outcome
- Growth Opportunities by Customer Journey: fixing your store stage by stage
- How do I set up Instant Search?
- How do I set up a filter group?
- How to set up cart drawer?
Last updated on
Onboarding & Dashboard
Onboarding & Dashboard in Sledge — 2 guides covering setup and day-to-day use.
Understanding your Sledge Dashboard: revenue, growth intelligence, and live signals
The Dashboard is the first screen you see when you open Sledge, and it’s built to answer three questions in the order a merchant actually asks them: is Sledge making me money?, what should I do next?,