
How to Create a Fix Bundle in Sledge?
A Fix Bundle is a fixed set of products sold together at a single discounted price — the classic “buy these two things together and save” offer. The customer doesn’t choose the contents; you do.
A Fix Bundle is a fixed set of products sold together at a single discounted price — the classic “buy these two things together and save” offer. The customer doesn’t choose the contents; you do.
That makes it the most predictable bundle type, and the one to reach for first. Because the contents never vary, you know exactly what margin you’re giving away and exactly what the customer receives. It works best on products that genuinely belong together — a shirt and the trousers that match it — where the pairing does some of the selling for you.
Fix Bundle is also unusual in one respect worth knowing up front: it’s the only bundle type where the products you pick are the offer itself. In the other types the products are a condition and the reward lives elsewhere. Here, the set is the deal.
Before you start — Sledge must be active on your theme. Have in mind which products belong in the set and what discount you’re willing to give. The example throughout this guide is a live bundle called Value Pack: an Ivory Classic Piqué Polo paired with Essential Comfort Chinos at 15% off.
Step 1 — Name the bundle and choose where it applies
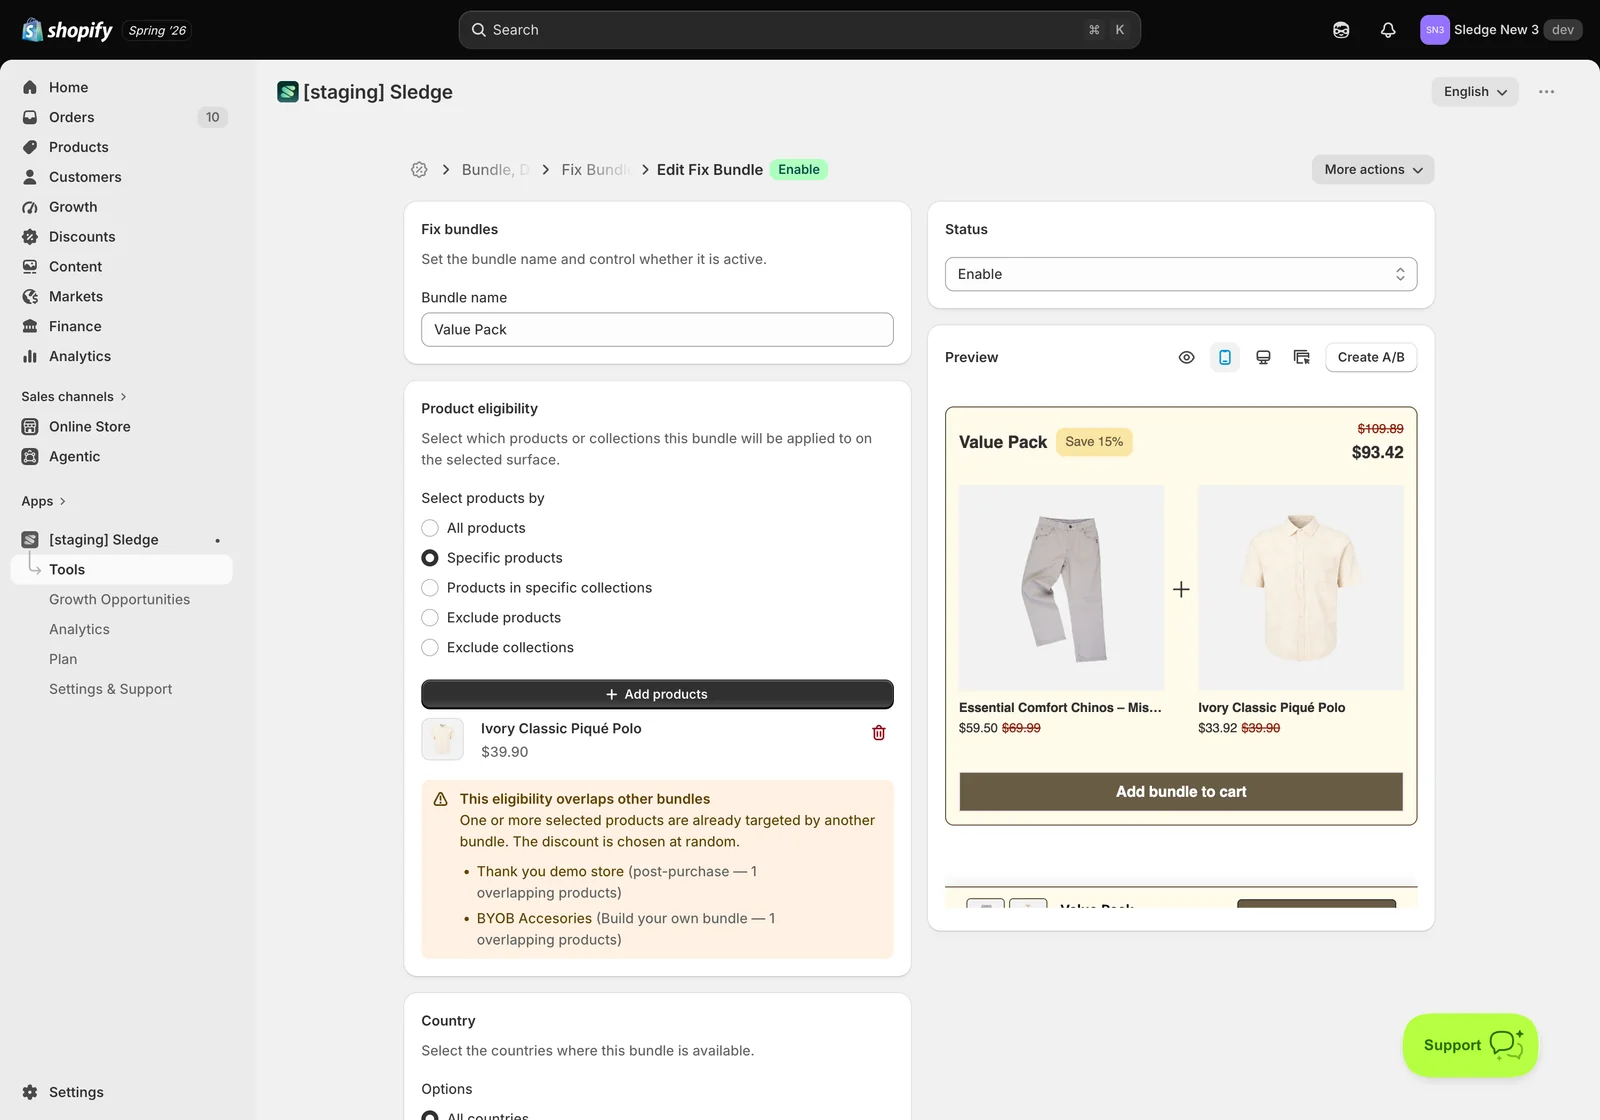
- Go to Tools → Bundle, Discount & Upsell → Fix Bundles and open a bundle, or create a new one.
- Bundle name — this is customer-facing. It appears as the heading on the bundle card, so Value Pack or Complete the Look reads better than an internal code.
- Product eligibility decides which product pages the bundle shows up on. Choose one:
- All products — the bundle appears everywhere.
- Specific products — only on the products you list. This is the usual choice, and the one in the example.
- Products in specific collections — everything inside a collection, so new products added later are included automatically.
- Exclude products / Exclude collections — everywhere except what you name.
- Click Add products and pick the anchor product — here, the Ivory Classic Piqué Polo. This is the page the offer appears on.
If you see an overlap warning — “This eligibility overlaps other bundles” means another bundle already targets one of these products, and Shopify will pick between the discounts at random. It won’t block you from saving, but it does mean the customer may not get the offer you intended. Narrow one of the two bundles if the overlap wasn’t deliberate.
Step 2 — Build the offer and set the discount
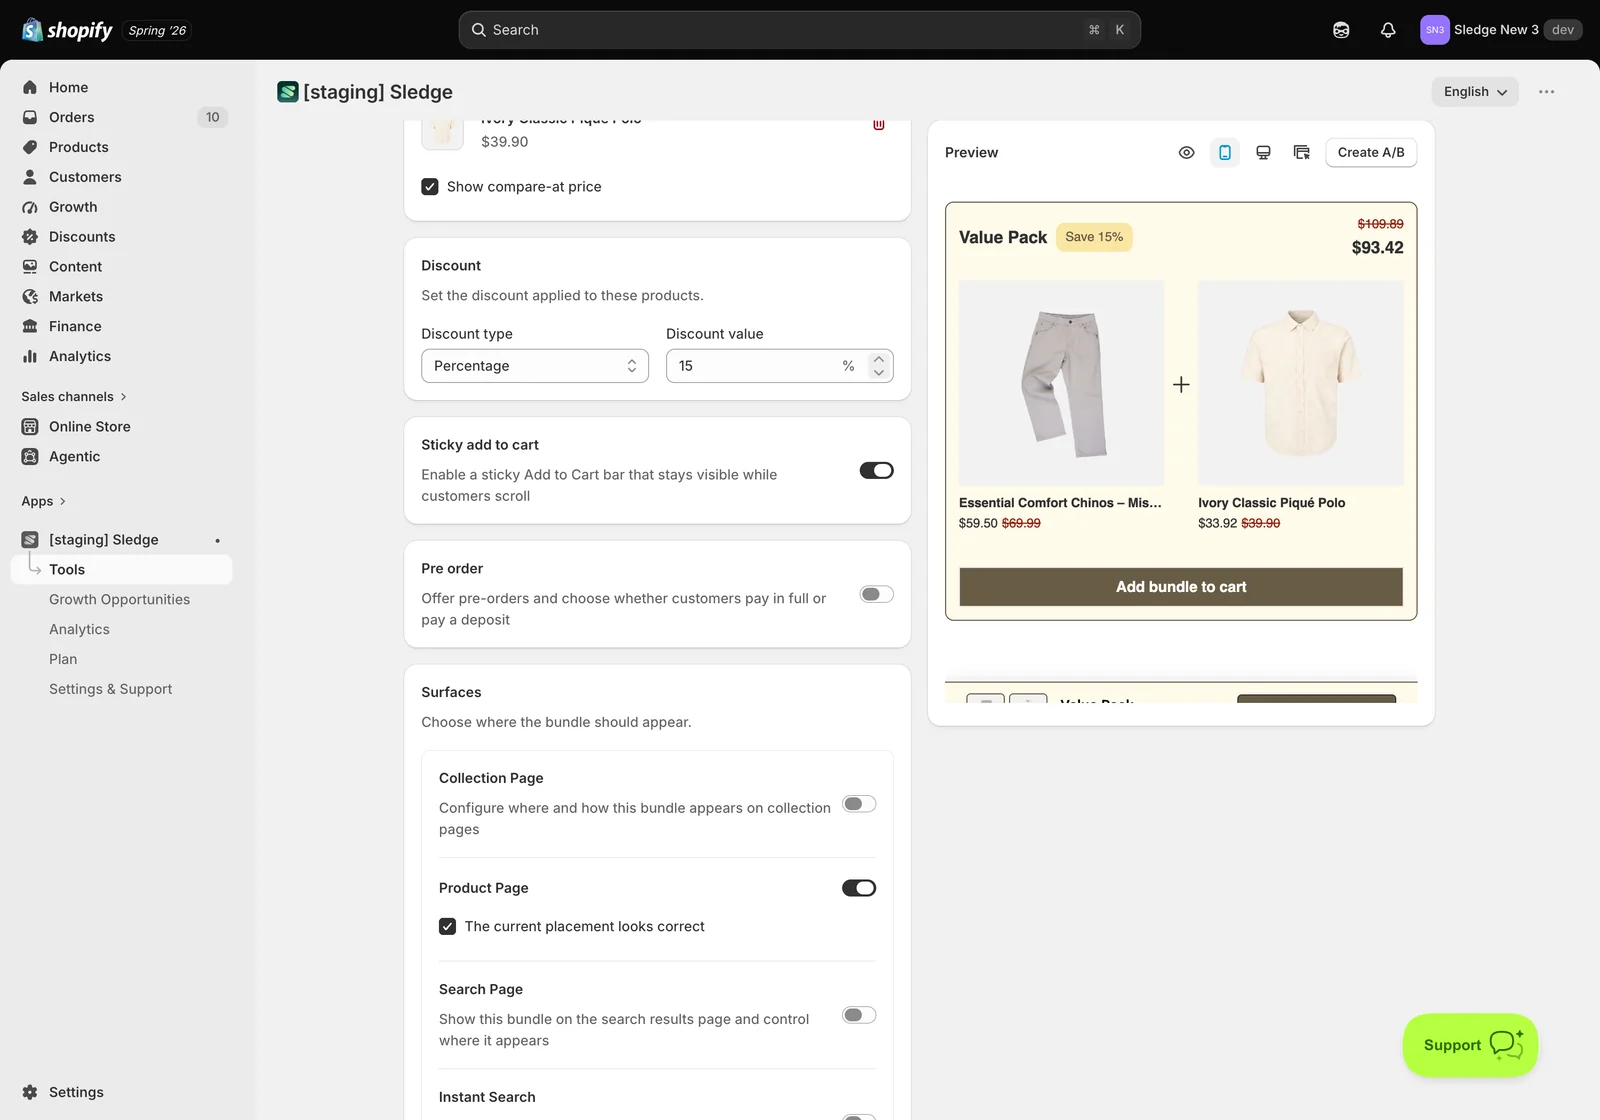
The Offer card holds the products that make up the set, each with a Show compare-at price option so the original price appears struck through beside the new one. Seeing $59.50 next to a crossed-out $69.99 is what makes the saving land.
- Discount type — Percentage or Fixed amount. Percentages read better on lower-priced sets; a fixed amount feels more concrete on expensive ones.
- Discount value — the size of the saving. The example uses 15%, which turns a $109.89 pair into $93.42.
- Sticky add to cart — keeps an Add to Cart bar visible as the customer scrolls, so the offer stays reachable on long product pages.
- Pre order — lets customers reserve the bundle before it ships, paying in full or leaving a deposit. Covered in its own guide.
- Surfaces — where the bundle renders: Collection Page, Product Page, Search Page and Instant Search. At least one must be on. Product Page is the natural home for a Fix Bundle, since that’s where someone is already considering one of its items.
Also on this page — Country limits the bundle to specific markets, Active dates schedules a start and end, and Countdown adds a timer to create urgency. All three are optional; leave them alone for an evergreen offer.
Step 3 — Customise how the bundle looks
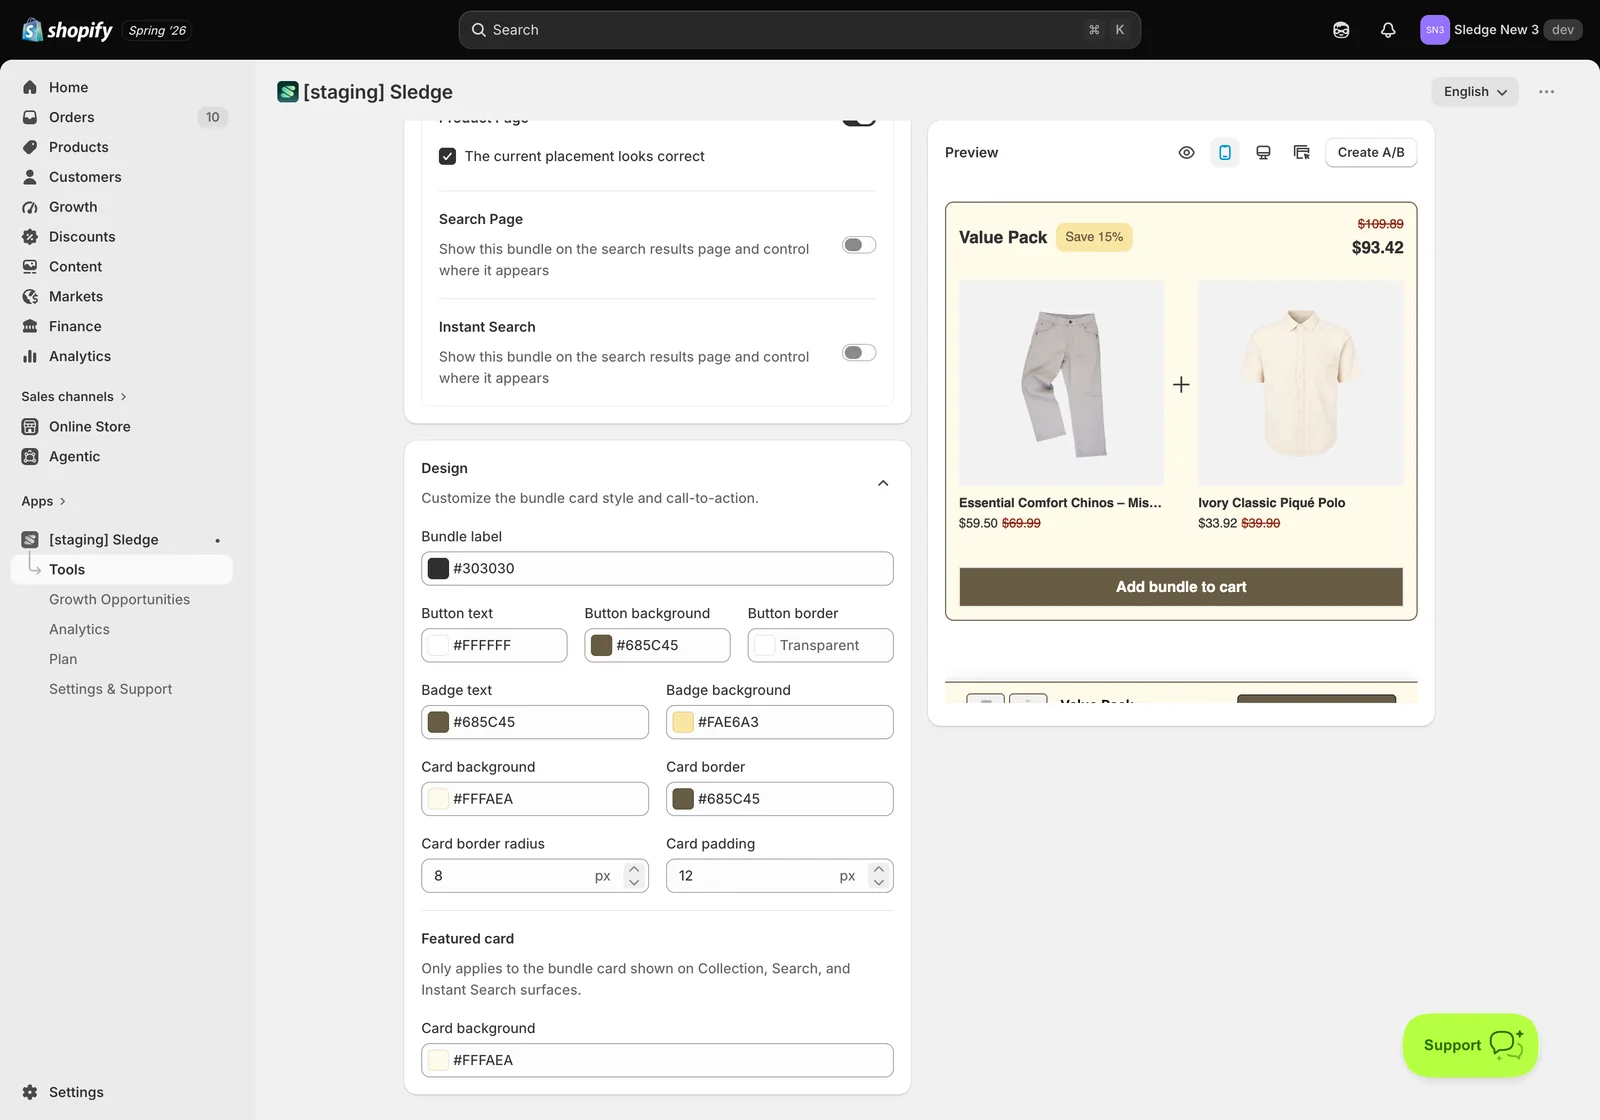
The Design card is where a bundle stops looking like an app widget and starts looking like part of your theme. Everything here is optional, but it’s the difference between an offer customers trust and one they scroll past.
- Bundle label — the colour of the bundle’s title text.
- Button text, Button background and Button border — the Add to Cart button. Match your theme’s primary button so the bundle’s call to action feels native rather than bolted on.
- Badge text and Badge background — the little savings flag (Save 15%). Give it enough contrast to be noticed, since it carries the whole pitch.
- Card background, Card border, Card border radius and Card padding — the panel the bundle sits in. Radius and padding are the settings that make it match your theme’s other cards.
- Featured card — a separate background colour used only where the bundle appears as a card on Collection, Search and Instant Search surfaces, where it sits in a product grid rather than on a product page.
Watch the Preview on the right as you change these — it re-renders live, so you can see the real bundle rather than guess from hex codes.
Step 4 — Save and publish
- Check the Preview, then click Save.
- Set Status to Enable. A saved bundle that’s still disabled won’t appear for anyone.
Result
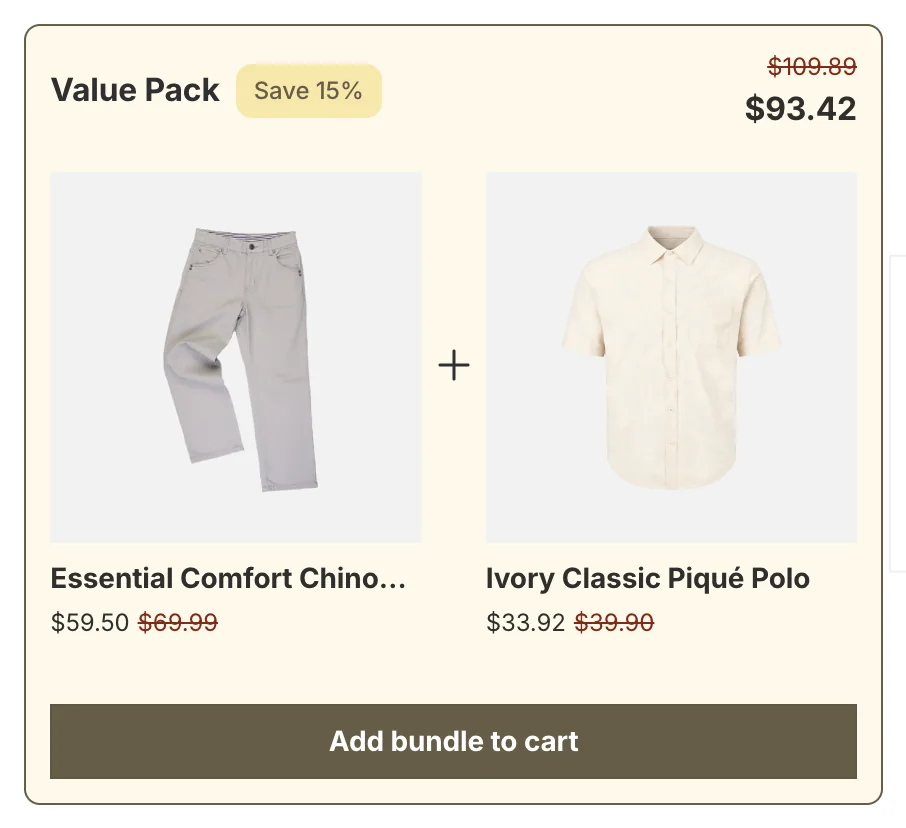
Done. The bundle now appears on the product pages you targeted. Below is Value Pack live on the storefront: both products with their individual discounted prices, the Save 15% badge, the combined price against the struck-through original, and a single Add bundle to cart button that adds the whole set at once.
Not showing up? Work through these in order — the first two cover most cases.
- Status must be Enable, and at least one Surface must be switched on.
- Check you’re looking at a product that’s actually in Product eligibility. The bundle only appears on the products you targeted.
- Every product in the set must be active and in stock — an unavailable product takes the bundle down with it.
- If a different discount is being applied, look for the overlap warning: another bundle is competing for the same product.
- If you set Active dates, confirm today falls inside the window.
- Storefront changes take about a minute to sync, so give it a moment before assuming it’s broken.
Related
Last updated on
How to Create a Buy X Get Y Offer in Sledge?
Buy X Get Y gives customers free units when they buy a set quantity — buy one get one, buy two get two, and so on. The reward is more of the same product rather than money off.
How to Create Product Add-ons in Sledge?
Add-ons suggest related products underneath the one a customer is already looking at, each available at a discount if they take it now.